Showing posts with label Blue Moon Scrapbooking. Show all posts

7.02.2013

June Picks Projects

I've been neglecting to post my projects lately.  But I thought I should share with you a couple of projects that came out of my June Picks for Blue Moon Scrapbooking.  If you want to know more about how I created these, have a look at the video below to get the scoop on the details.


I highly recommend checking out the Art Anthology dimensional paint!  Lots of fun to play with there.


And in case you really like watching the videos.....ta da!


Oh, and you can see a complete list of the picks that I chose for this month here.

3.06.2013

Make Your Own Enamel Dots

Good day friends.  I wanted to share a layout and a video today on how to create your own 'Enamel Dots'.  You'll notice that this layout is created from supplies from the February picks for my project life last month.

I've been creating with some super fun products lately that I've purchased over at Blue Moon Scrapbooking.  If you haven't checked out their shop, I do hope you will.  Scott and Lisa work very hard to get in the newsest products and I am amazed at the service they offer.  

I am designing for them, but I've been shopping with them for about 4 years, long before I began working with them directly.  They ship all over the world (free shipping in the States on every order of $50, no codes necessary!)!  One of the things I love is that they have a lot of variety of types of products, including many many mixed media items.  In addition, if you are looking for something that they don't have, ask them about it. They really do listen to their customers.

Ok, so I promised a layout and a video demonstrating the awesome Viva Decor pens.  Here tis!


You can find these pens in the store right here in lots of different colors, including some that are transparent.  Super fun!

And a few photos of the layout....


You can see a detail of how beautiful that Julie Balzaar mask is.  I love all the options available just on that one single mask.


I'm a big fan of inking my stamps with cat's eye inks so I can add a specific color to a specific portion of the stamp.


Enamel dots in action.  The color of these is actually turquoise but it photographed almost cobalt, not sure why that is.


Do let me know if you give making your own enamel dots a try.  I'm guessing you'll be addicted pretty quickly like me!

2.17.2013

Tone on Tone Texturing

I have to admit that I am beginning to wonder how it is that I found time to blog daily for a while there. I can scarcely stay afloat at this point. I've been lucky to get one or two posts a week. Ack!

Ah well, I do have a layout I am super happy to share with you today. I wish I had taken a photo of the background so I could show you what it looked like before I put together the whole page. Gotta tell you that I was sorely tempted to just leave it like that and admire it for a good long while. That's the sort of crush I had on this 'paper'.

Oh wait, guess what, I do have this pic that I took. It isn't the whole thing, but it'll give you and idea at any rate. Imagine a whole 12x12 paper like this. You'll understand why I was a little bit loathe to cover it up.


But alas, I felt I needed to use this as a paper and dress it up further.  What better way to begin then with some masks and mists.  I used a variety of masks from Donna Downey and Studio Calico to create a pastel wash of color on the left of the page.

Then, I started layering some fun pieces from my stash.


I glued each of the 'xo' design pieces down using liquid glue and a bit of time.  What I love here is the tone on tone effect.  It's very subtle, but also powerful.  In the case of this layout, it makes a strong statement about the theme of the page.


All the product came from Blue Moon Scrapbooking so if you want to pick any of it up, you can find the complete list of products used at this post. (There's also a wee video!)


Oh and I wanted to point out that there is a very freeform stitched heart on the page as well.  I thought you'd like to know that this was totally an afterthought.  As in.......after the layout was finished, I thought it would have looked cool if there were a stitched heart over the whole page.  

Not to be daunted, I went ahead and added one.  It may not be perfect, but it's effective and I like the finished effect.  Was I frightened???? YES!  But I'm glad I decided to be brave.

Hope you have a happy Monday!  Thanks for stopping in!

2.12.2013

A Valentine's Card

Hey there.  Time has slipped by me lightning fast this week.  Here it is already Wednesday and this is my first post.  Oh well, better late then never.

Are you late getting those Valentine's Day cards made??

I have a quick share for you today.  Quick as in, I don't have tons to say but I have a Valentine's Day card idea to share that is super quick to make!

I used a Tim Holtz Sixxix die, Stacked Words: Valentine's to create this card along with some white and red cardstock, a heart punch, some mist, some ink and a Studio Calico gem.  This card goes together super quick but I think it has great impact.

The die I used is all sold out over at Blue Moon Scrapbooking, but you could get a very similar effect using an alphabet die such as this and cutting out a few of the x and o.

(Psst, Blue Moon Scrapbooking has been getting in a ton of the new goodies from CHA including lots of new Crate, Maggie Holmes, Amy Tangerine, Studio Calico and so much more!)

Ok, back to the regularly scheduled programming.


All you need to do is cut your shapes out of white cardstock, with exception to one of them, which you'll cut from Red Cardstock.  Mist one using red and pink mists.  Ink one using a very pale pink ink.  I used Tim Holtz Distress Ink Pad SPUN SUGAR.  Line them up along the edge of your card and glue them down. 

Finish by punching a small heart shape.  Add a foam dot (these are my favorites) to pop it up and glue it in the center of the red 'O'.  Add a gem to the heart and you all are set.


You can do this concept using a variety of shapes.  Hearts, the word 'LOVE'.  Really, the possibilities are endless.  Have fun!

2.07.2013

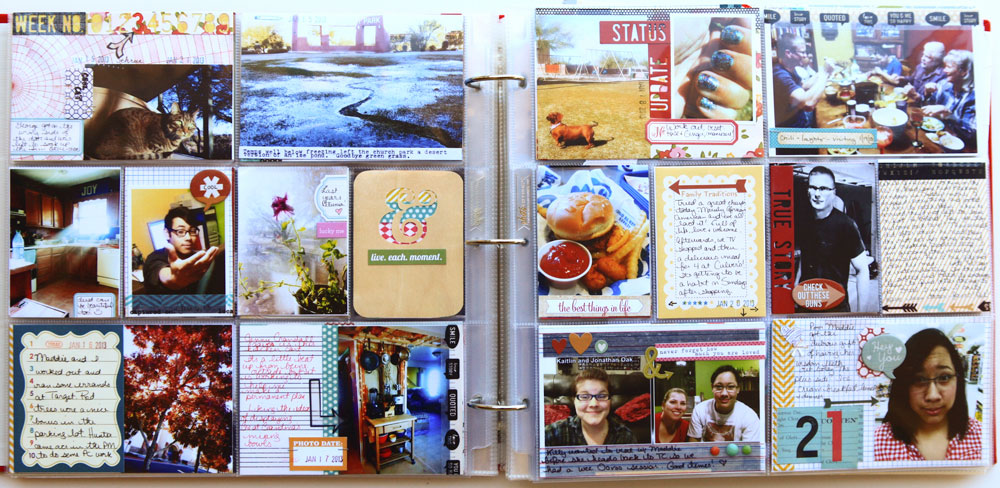
Project Life -- January 2013

Can you believe that January is already behind us?  I'm a little shocked to be honest.  I'd almost be convinced that it hadn't happened at all except for the fact that I've got a Project Life album to prove that it did!

And that is what I'd like to share with you here today.  I'll be sharing the photos of my layouts as well as tidbits about my philosophy along the way.  I'm excited to see how my process will evolve as we move forward.  I think there will be LOTS of changes in store, both to keep things interesting and to make improvements.

This post will be pretty photo heavy so get ready.  Here we go.  I'll share the full spread, then the individucal pages and finally, any detail images will be interspersed.


The first thing I noticed as I got rolling on this project is that there is more happening in my life than I had realized.  I'm actually having a tough time keeping it to only 2 pages per week.  I think that may change as I move forward, but for now, I've got lots to share about.


Tip: Make sure and include the Entertainment that is catching your attention during this particular period.  The truth is, it really captures us and tells something about who we are. This month, Downton Abbey has had a prominent place in my entertainment.


I'm being careful to not add too many thicker items such as the wood veneer or chip pieces, but if I do add them, I'm trying to add them to the same page for consistency.


Tip: Make sure you are including yourself in your album. This won't be as tough if you're single, or married without children, but if you have young ones, it's tempting to just write about/photograph only others.  Don't do it!  You are important to your family and they'll want to see photos of you, see your thoughts and admire your handwriting.  Even if you don't.


Small details are important to me, so using things like word and shape stickers really makes it more unique for me.


And I know you aren't surprised to find that Washi tape is playing a huge roll in my album.  I love this because it adds color and pattern, it's easy and it's FLAT!  Score!


 I'm also finding that my creativity ebbs and flows.  I'm not letting that stress me.  If I feel super creative to do something above and beyond, that is great.  But if I don't, I'm not going to let that keep me from documenting.  My album isn't about the paper and the tape, it's about the memories being captured so I am keeping that the focus.


This week held a bit more creativity and the page below has lots that I love, both in terms of the photography and the design execution.


A kit company had a Project Life kit that I admired, but wasn't able to get on the waiting list in time for.  It had some fun pieces and one that I particularly admired was a wood veneer card with a cutout of an ampersand.  Not to worry, I created my own similar card using my Silhouette.  It's not exactly the same, but the feeling is close enough and I'm happy with the result.


Overstamping anyone?  I did alot of that this month.  When the stamp didn't stamp true the first time, just do it again!  Graphic!


For the shot below of the TV's at Costco, I didn't care for all the white space at the top of the picture once I got it printed out so I used some washi tape to cover it up and added a sticker title on top.


That's it for the month of January.  You can find info about what all I used to create my PL this month here.
If you'd like to see the video we did of the pages above, you can find that here.

Happy creating!  If you have any questions for me, make sure to leave them in the comments and I'll do the best I can to answer.  If you leave your email, I can answer that way, otherwise, I'll include it in the blog.  Thanks for stoping by!

2.06.2013

Project Life Picks for Febrary and some sneaks

Hey friends!  I've had a busy week getting some things ready to share with all of you this week.  As I type, I am 'in the zone' for creativity.  Loving the creations that are coming from my studio and can't wait to share them with you in full!

First up, I wanted to make sure you get a look at my February Project Life Picks.  These are all the goodies I've decided to work with for the month of February.  You can find them at Blue Moon Scrapbooking and if you'll click HERE, they are all linked up to the store for you.  Here's the video too!


Did you know that Scrapbook Circle also has it's February kits, Story Time and Page Turner starting to ship?  I've been creating with them and I am super excited about the results.  Here are a couple of sneaks until I get to show you more.


Hope you're having a great Thursday!  Be Blessed!

1.06.2013

Hello Monday -- Hello Project Life


It is time to unveil a little something I've been working on with Blue Moon Scrapbooking!  I am sooo excited to share with you my Project Life Picks for January 2013!  If you click on over to the Blue Moon Scrapbooking Blog, you'll find links for the goodies I'm using on my project this month.  

I'm sharing a little video below with a few ideas for how I'll be putting together my pages this month.  My desire is share helpful tips throughout the year on my process so that this project can be streamlined.  The most difficult thing with Project life is that it can get overwhelming.  Our goal will be to find ways to make it absolutely doable. 

If you have questions or concerns, please leave them in the comments and we'll be doing our best to address them along the way.

I'll show how I used all of my monthly picks at the beginning of a new month.  In addition, we'll suggest new picks each month. Some of these will be tools that you can use throughout the year and some will be new supplies that will help you keep your album fresh.  If you're like me, you don't want to use the same old supplies all year long so this will help you to choose items that will coordinate and cover all of the types of product that you'd typically want in your Project Life album.


11.02.2012

Hello Friday --More Happy Goodies from Blue Moon

Lisa over at Blue Moon Scrapbooking has been keeping me busy.  Here is another layout that was on the blog over there recently.  Thought I'd better give it a chance to be seen over here as well.


The photos here have been around for about 6 years!  I've been going back and scrapping some of the images that got past me before.  My girl was only 13 and so so beautiful and elegant.


Layer layer layer.


 My favorite thing lately is stamping in a rainbow.  Can you tell?


 A list of the supplies I used from the shop can be found here.

Hope you all have a wonderful weekend. My hubby and I will have the opportunity to play some music tomorrow for the Market on the Move even that will be happening monthly on our church campus from now until May.  It's a pretty exciting opportunity.  What are you looking forward to this weekend?

10.17.2012

Hello Thursday -- My Beautiful Girl

Hello friends.  I'm still coming down from a recent visit with my daughter Maddie who's been in residence at Teen Challenge since April.  It was one of the hardest decisions we ever had to make to send her.  How thankful we are that we were able to see how God is doing a work in her broken heart.

I made this layout after coming down off of that high.

Gotta credit Blue Moon Scrapbooking as every single thing on this page came from their store.  Have I mentioned how glad I am that they are just in my backyard.  It's really even better than an LSS as they can carry so much more than a typical storefront would be able to do.


I used a lot of the new Dear Lizzy 5th & Frolic as the starting point for this page.  To that, I added a number of pieces from the new Crate Paper On Trend.  The Maya Road goodies came in too, and I incorporated the linen trim, key and wooden tags.  There are a few other bits and bobs so feel free to ask questions if you have any.


The detail above is one of my favorite parts of this page.  I am loving having stray threads 'hanging around.'


I thought I'd also mention that the wings were cut using the new Tim Holtz Wings Die.  The middle sized one is that gorgeous gold polkadot vellum from Dear Lizzy, but it this case, I removed a miniature version from her little daybook
.

Ok, maybe the wings are my favorite part??  I love them too!

Thanks for looking today!  Have a fabulous day.

10.09.2012

Hello Wednesday -- In full detail

Hello again. I have been a crafting maniac!  No really, it's true.  Yesterday, I completed a layout and half of a mini-album (from scratch!) And today,  I completed 3.5 layouts!!!  You may not know this about me, but I am SLOOOOWWWW. At least usually I am.  But since I have a load of deadlines I am cranking out the goods.  I feel good!

Here's a wee peek at what is coming down the pike.

This first one is all three of today's projects stacked.


This is the first one in more detail cause I'm pretty darn stoked about it.


Yesterday's labors included this...

and this


I've been posting these on my Instagram so if you want in on the action before it makes it to the blog, make sure and follow me there as ursie1972. (there's a cute little button for this purpose at the top of my blog on the left tool)

 I wanted to post the layout and tag from the Blue Moon Scrapbooking video I shared on this post so you could see them in full detail.

Here they are, in full glory!


Alrighty ladies and gents! Hope you have a wonderful Wednesday!
Related Posts Plugin for WordPress, Blogger...