Showing posts with label scrapbook. Show all posts

7.05.2013

Our Marriage is Old Enough to Drink!

Ok, I admit it, I was pretty proud of how clever I am coming up with this title.  Now that this is out of the way, I can tell you a bit more about my layout.


The truth is, it's super simple.  I pulled a couple of pages from the DIY Shop paper pad from the July Embellishment add-on.. Cut out the file I created for the title (pictured below) and added a few of the super fun and easy to use embellishments from the Let's Chat kit.  A really easy layout to make but I like the impact.


Since I backed the Silhouette cut with a bold yellow paper, it really does stand out.  To add a bit more emphasis, I outlines the cut with a fine black marker.


 This last rub on I decided not to 'rub on'.  Instead, I cut it from the sheet and stapled it to my photo for a slightly different effect.  I had to cut it out in either case and once I got it trimmed, I like the effect.  I did cut it out a bit more than I might have had I simply used it in the normal fashion.


And yes, in case you're wondering, our marriage really IS old enough to drink. We've been married for 21 years.  Sometimes it seems like just yesterday that we started this adventure together.  I could not be more blessed in my marriage.  Has it always been easy?  Heck no!  But I do believe that we've grown together and individually over the course of our marriage and I am super thankful for that!


5.08.2013

Girly Pages and Manly pages from the Same Kit!

May's kits, My Favorite and the Sugar and Spice add-on really had a feminine feel to them.  However, not having lots of girlyness to scrap this month, I had to look past what I saw first to see that this is one super versatile kit!

The first layout I made was an anthology of this years nail polish colors and designs.  How much more girly can you get?!  I love how the soft pinks and yellows textureized by that awesome ribbon really allowed me to create a very feminine page.


Even the font I used for my title adds to the femininity of this project.


Now, on the flip side, I wanted to create a 'Random Facts' page about my hubby.  He's....uh, ......not so much about frills!  (and can you believe this is the first time I've done the random facts thing?!  Where have I been hiding anyway??)

The kit includes some wonderful pieces that complement masculinity very well.  The stars paper, for one, in blue and black created a perfect place to begin my page

I selectively cut a few of the pieces of tape from the Maggie Holmes Washi paper .  And those metal Basic Grey star studs were the perfect accent to my mainly project.


Even the Chipboard pieces which had a lot of feminine shapes and colors, found a place on my page via the small blue frame and the negative of the arrow image.


I colored the corrugated 'potty man' red by just a swipe of ink from my favorite red ink pad.


The lesson is that Scrapbook Circle kits always offer enough versatility to create whatever kind of layout you need them too. I hope you'll share with us some unexpected ways that you used supplies which initially had a specific feel to create a completely different look.  The place to share is our Facebook page.  Can't wait to see what you've created!


3.27.2013

Use Those Instagrams

Today's layout showcases the use of Instagrams for a 'month in review' style layout.  I did something a little different in the printing.  I created a document that was 12x8 with two inch photos.  Then, I chose some portions to print blank.  When I printed it out, I cut the blank ones out with my Exacto knife and backed them with pretty papers.

One strip of the photos was cut off and added to the bottom of the page.

I added a feather behind the Dear Lizzy card to create a bit of extra texture.


I couldn't leave those little squares and rectangles naked so I added punches, words and some die cuts to keep true to form.

 
The arrow is stitched using Amy Tangerine's stitching templates from the March kits at Scrapbook Circle.  All the supplies are from the Charmed Life and Lucky girl kits over at Scrapbook Circle.


Thanks for stopping in.  Have a happy Thursday.  And if you're of a mind to, our family could use prayer right now. Thanks in advance.

3.10.2013

Happy Monday

I've been trying to create at least one or two layouts or projects each month from my Project Life Picks.  This month it ended up being a couple of layouts.  Today, I'm sharing the second one that I'd created during February.  I know, I'm a little behind schedule, but in my defense, I was sick for a solid two weeks and had a houseful of guests for one of those weeks. 

As a result, this may be a banner week on the blog as I try to catch you all up on what I've been busy at lately.

If you rather have the quick version, here is the video!


The project below came as a result of the fantastic supplies I picked up at Blue Moon last month.  I will freely admit that I overshopped last month. Yes, I really did.  There was a LOT of great new release product in the shop and I got a little carried away. I ended up with a few more full sheets of Patterned Paper than I really needed.

Not to worry, the sorts of papers I tend to use in my PL are like the background below.  They create great base cards for PL but also work as a nice background for a full page.  (and the grid helps me keep things straight, which I definately need help on!)

We had several days where we got snow in February, which means it was absolutely a banner month.  This was the first of the heavier snows and my son and I were like two little kids running around and whooping and hollering in it.  Soooo much fun.  I wanted to document the great time we had.


I used that great Julie Fei-fan Balzar mask again to add a bit more texture to the base page.


I also use the Dienamic's die to create quite a few of the elements on my page.  I love how versatile this particular group of dies has been.  There is no substitute for great design and this set of designs rocks!  There are no less than 10 die cut pieces on this project.


I also allowing myself to pull some random pieces from my stash as there is something I need.   This time it was the Jenni Bowlin tags, white thickers and some word stickers from Authentique.


If you're looking for the full list of goodies, you can find all the original products from the February picks right here.

I plan to be back tomorrow to share more fun so I hope to see you then.  Thanks for stopping by!

3.06.2013

Make Your Own Enamel Dots

Good day friends.  I wanted to share a layout and a video today on how to create your own 'Enamel Dots'.  You'll notice that this layout is created from supplies from the February picks for my project life last month.

I've been creating with some super fun products lately that I've purchased over at Blue Moon Scrapbooking.  If you haven't checked out their shop, I do hope you will.  Scott and Lisa work very hard to get in the newsest products and I am amazed at the service they offer.  

I am designing for them, but I've been shopping with them for about 4 years, long before I began working with them directly.  They ship all over the world (free shipping in the States on every order of $50, no codes necessary!)!  One of the things I love is that they have a lot of variety of types of products, including many many mixed media items.  In addition, if you are looking for something that they don't have, ask them about it. They really do listen to their customers.

Ok, so I promised a layout and a video demonstrating the awesome Viva Decor pens.  Here tis!


You can find these pens in the store right here in lots of different colors, including some that are transparent.  Super fun!

And a few photos of the layout....


You can see a detail of how beautiful that Julie Balzaar mask is.  I love all the options available just on that one single mask.


I'm a big fan of inking my stamps with cat's eye inks so I can add a specific color to a specific portion of the stamp.


Enamel dots in action.  The color of these is actually turquoise but it photographed almost cobalt, not sure why that is.


Do let me know if you give making your own enamel dots a try.  I'm guessing you'll be addicted pretty quickly like me!

2.28.2013

Not One, but Two

Hola chickadees!  I've got a couple layouts to share today from the February kits over at Scrapbook Circle. I'm keeping this short and sweet as I have been in my bed since Monday with a very very nasty bug.  So, as you can imagine, I'm tired and cranky.

I'm a little sad I'm not going to be able to wax philosophical over these two pages as they are two of my absolute favorites from February's kits.  But alas, I'm too tired and cranky to go on an on.  So, without further ado.........


Did I mention how much I loved February's kits. Story Time is still available in the shop!  Grab it while you can. And don't forget to pick up March's kits, Charmed Life and Lucky Girl,  which have just been released!.  I'll be showing you some of the fun projects from that kit very soon!

And for the record, I loved all the layouts that came out of these kits.  LOVED!  The colors and paterns were just right up my alley.

2.17.2013

Tone on Tone Texturing

I have to admit that I am beginning to wonder how it is that I found time to blog daily for a while there. I can scarcely stay afloat at this point. I've been lucky to get one or two posts a week. Ack!

Ah well, I do have a layout I am super happy to share with you today. I wish I had taken a photo of the background so I could show you what it looked like before I put together the whole page. Gotta tell you that I was sorely tempted to just leave it like that and admire it for a good long while. That's the sort of crush I had on this 'paper'.

Oh wait, guess what, I do have this pic that I took. It isn't the whole thing, but it'll give you and idea at any rate. Imagine a whole 12x12 paper like this. You'll understand why I was a little bit loathe to cover it up.


But alas, I felt I needed to use this as a paper and dress it up further.  What better way to begin then with some masks and mists.  I used a variety of masks from Donna Downey and Studio Calico to create a pastel wash of color on the left of the page.

Then, I started layering some fun pieces from my stash.


I glued each of the 'xo' design pieces down using liquid glue and a bit of time.  What I love here is the tone on tone effect.  It's very subtle, but also powerful.  In the case of this layout, it makes a strong statement about the theme of the page.


All the product came from Blue Moon Scrapbooking so if you want to pick any of it up, you can find the complete list of products used at this post. (There's also a wee video!)


Oh and I wanted to point out that there is a very freeform stitched heart on the page as well.  I thought you'd like to know that this was totally an afterthought.  As in.......after the layout was finished, I thought it would have looked cool if there were a stitched heart over the whole page.  

Not to be daunted, I went ahead and added one.  It may not be perfect, but it's effective and I like the finished effect.  Was I frightened???? YES!  But I'm glad I decided to be brave.

Hope you have a happy Monday!  Thanks for stopping in!

2.07.2013

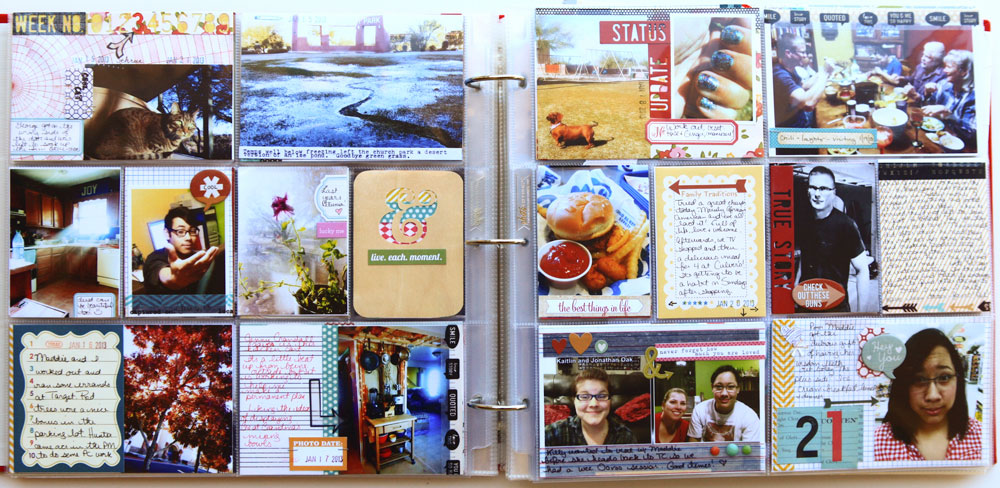
Project Life -- January 2013

Can you believe that January is already behind us?  I'm a little shocked to be honest.  I'd almost be convinced that it hadn't happened at all except for the fact that I've got a Project Life album to prove that it did!

And that is what I'd like to share with you here today.  I'll be sharing the photos of my layouts as well as tidbits about my philosophy along the way.  I'm excited to see how my process will evolve as we move forward.  I think there will be LOTS of changes in store, both to keep things interesting and to make improvements.

This post will be pretty photo heavy so get ready.  Here we go.  I'll share the full spread, then the individucal pages and finally, any detail images will be interspersed.


The first thing I noticed as I got rolling on this project is that there is more happening in my life than I had realized.  I'm actually having a tough time keeping it to only 2 pages per week.  I think that may change as I move forward, but for now, I've got lots to share about.


Tip: Make sure and include the Entertainment that is catching your attention during this particular period.  The truth is, it really captures us and tells something about who we are. This month, Downton Abbey has had a prominent place in my entertainment.


I'm being careful to not add too many thicker items such as the wood veneer or chip pieces, but if I do add them, I'm trying to add them to the same page for consistency.


Tip: Make sure you are including yourself in your album. This won't be as tough if you're single, or married without children, but if you have young ones, it's tempting to just write about/photograph only others.  Don't do it!  You are important to your family and they'll want to see photos of you, see your thoughts and admire your handwriting.  Even if you don't.


Small details are important to me, so using things like word and shape stickers really makes it more unique for me.


And I know you aren't surprised to find that Washi tape is playing a huge roll in my album.  I love this because it adds color and pattern, it's easy and it's FLAT!  Score!


 I'm also finding that my creativity ebbs and flows.  I'm not letting that stress me.  If I feel super creative to do something above and beyond, that is great.  But if I don't, I'm not going to let that keep me from documenting.  My album isn't about the paper and the tape, it's about the memories being captured so I am keeping that the focus.


This week held a bit more creativity and the page below has lots that I love, both in terms of the photography and the design execution.


A kit company had a Project Life kit that I admired, but wasn't able to get on the waiting list in time for.  It had some fun pieces and one that I particularly admired was a wood veneer card with a cutout of an ampersand.  Not to worry, I created my own similar card using my Silhouette.  It's not exactly the same, but the feeling is close enough and I'm happy with the result.


Overstamping anyone?  I did alot of that this month.  When the stamp didn't stamp true the first time, just do it again!  Graphic!


For the shot below of the TV's at Costco, I didn't care for all the white space at the top of the picture once I got it printed out so I used some washi tape to cover it up and added a sticker title on top.


That's it for the month of January.  You can find info about what all I used to create my PL this month here.
If you'd like to see the video we did of the pages above, you can find that here.

Happy creating!  If you have any questions for me, make sure to leave them in the comments and I'll do the best I can to answer.  If you leave your email, I can answer that way, otherwise, I'll include it in the blog.  Thanks for stoping by!
Related Posts Plugin for WordPress, Blogger...